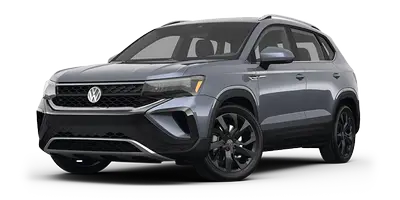
Volkswagen Taos: Electric drive. Charging socket, with charging cable
- Assembly overview – charging socket
- Removing and installing high-voltage battery charging socket 1 [UX4]
- Removing and installing actuator for high-voltage charging socket lock 1 [F498]
Assembly overview – charging socket
Assembly overview – charging socket
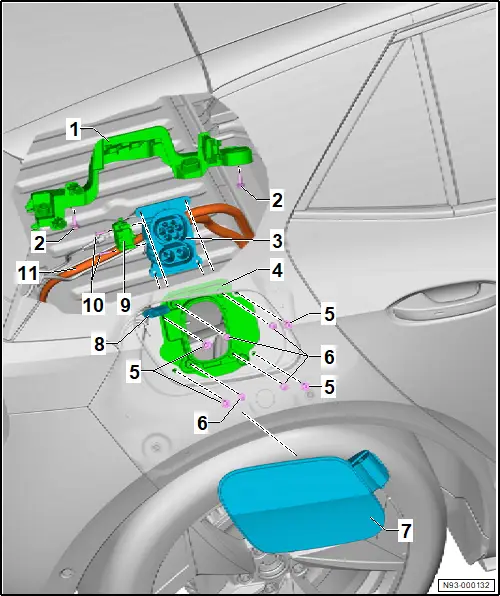
1 - Bracket
2 - Bolt
❏ Qty. 2
❏ M6×20
❏ 8 Nm
3 - High-voltage battery charging socket 1 -UX4-
❏ With charging cable → Rep. gr.93; Removing and installing high-voltage battery charging socket 1 [UX4]
4 - Bracket
5 - Bolt
❏ Qty. 4
❏ M6×18
❏ 8 Nm
6 - Bolt
❏ Qty. 4
❏ 8 Nm
7 - Charging flap unit
❏ → General body repairs, exterior; Rep. gr.55; Charging flap unit; Removing and installing charging flap unit
8 - LED module for charging socket 1 -L263-
❏ → General body repairs, exterior; Rep. gr.55; Charging flap unit; Removing and installing LED module for charging socket 1 [L263]
9 - Actuator for high-voltage charging socket lock 1 -F498-
❏ → Rep. gr.93; Removing and installing actuator for high-voltage charging socket lock 1 [F498]
10 - Bolt
❏ Qty. 2
❏ 1.2 Nm
11 - Charging cable
❏ With high-voltage battery charging socket 1 -UX4-
Removing and installing high-voltage battery charging socket 1 [UX4]
Removing and installing high-voltage battery charging socket 1 [UX4]
The high-voltage battery charging socket 1 -UX4- will henceforth be referred to as “charging socket”.
Removing
 DANGER
High voltage can cause fatal injury.
Danger of severe or fatal injuries from electric shock or electric arcs.
– Have a high-voltage technician (HVT) or a high-voltage expert (HVE) de-energise the high-voltage system.
– → Rep. gr.93; De-energise high-voltage system.
– Detach right luggage compartment side trim → General body repairs, interior; Rep. gr.70; Luggage compartment trims; Removing and installing luggage compartment side trim.
Note
The charging socket can only be removed in conjunction with the charging cable.
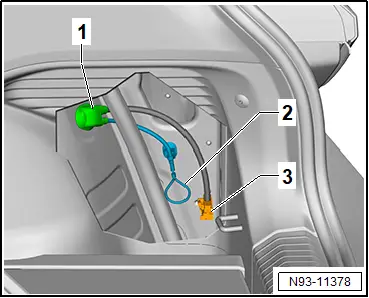
– Detach manual release mechanism -2-.
– Disconnect electrical connector -3-.
– Release cable duct -1-.
– Remove charging flap unit → General body repairs, exterior; Rep. gr.55; Charging flap unit; Removing and installing charging flap unit.
– Remove rear right wheel housing liner → General body repairs, exterior; Rep. gr.66; Wheel housing liner; Removing and installing rear wheel housing liner.
– Remove rear underbody cladding → General body repairs, exterior; Rep. gr.66; Underbody cladding; Removing and installing rear underbody cladding.
– Remove rear centre underbody cladding → General body repairs, exterior; Rep. gr.66; Underbody cladding; Removing and installing rear centre underbody cladding.
High-voltage battery, 55 and 62 kWh
– Remove centre underbody cladding → General body repairs, exterior; Rep. gr.66; Underbody cladding; Removing and installing centre underbody cladding.
– Remove reinforcement for high-voltage battery body aperture → Rep. gr.93; Assembly overview – high-voltage battery, installed
All vehicles (continued)
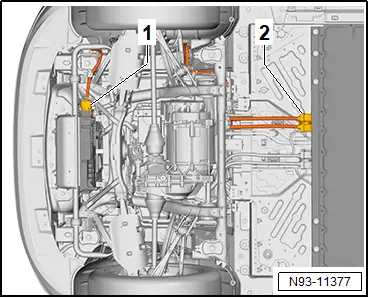
– Disconnect connector -1- on charging unit 1 for high-voltage battery -AX4-.
– Separate connector -2- on high-voltage battery 1 -AX2-.
– Remove hose -1-.
– Unscrew bolts -2-.
– Unscrew bolt -3-.
– Unscrew bolt -4-.
– Release wiring fasteners -5-.
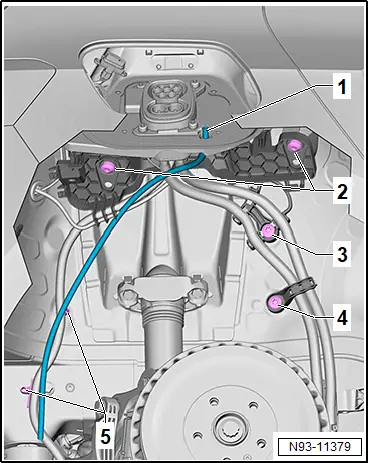
– Lower rear axle in front area → Running gear, axles, steering; Rep. gr.42; Rear axle; Lowering rear axle.
– Remove charging socket with bracket.
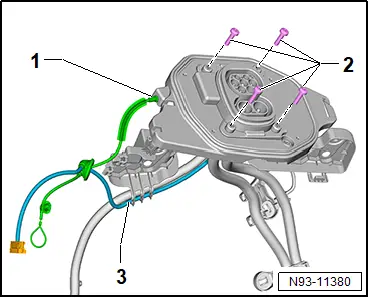
– Detach Bowden cable for manual release mechanism -1-.
– Remove electrical wire -3- from guide.
– Unscrew bolts -2-.
– Detach charging socket from bracket.
Installing
Install in reverse order of removal, observing the following:
 WARNING
High voltage can cause fatal injury.
Danger of severe or fatal injuries from electric shock or electric arcs.
– Have a high-voltage technician (HVT) or a high-voltage expert (HVE) re-energise the high-voltage system.
– → Rep. gr.93; Re-energise high-voltage system.
– Tighten bolts -3- and -4-.
 BoltsSpecified torque -3- and -4- 8 Nm
Tightening torques
♦ → Rep. gr.93; Assembly overview - charging socket
Removing and installing actuator for high-voltage charging socket lock 1 [F498]
Removing and installing actuator for high-voltage charging socket lock 1 [F498]
The actuator for high-voltage charging socket lock 1 -F498- will henceforth be referred to as “actuator”.
Removing
 DANGER
High voltage can cause fatal injury.
Danger of severe or fatal injuries from electric shock or electric arcs.
– Have a high-voltage technician (HVT) or a high-voltage expert (HVE) de-energise the high-voltage system.
– → Rep. gr.93; De-energise high-voltage system.
Note
The charging socket just needs to be loosened. It is not necessary to lower the rear axle.
– Release charging socket → Rep. gr.93; Removing and installing high-voltage battery charging socket 1 [UX4].
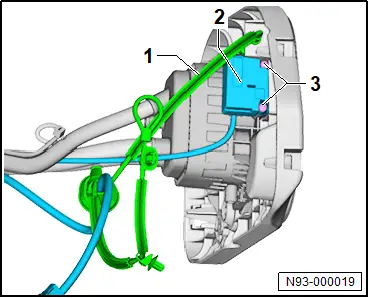
– Detach Bowden cable for manual release mechanism -1-.
– Unscrew bolts -3-.
– Remove actuator -2-.
Installing
Install in reverse order of removal, observing the following:
– When installing, make sure that the actuator makes proper contact with the contact surface and that the bolt mountings are not damaged.
– Separate and join electrical wire according to instructions for wiring repairs → Electrical system; Rep. gr.97; Wires; Repairing a 0.13 mm² to 6 mm² wire.
 WARNING
High voltage can cause fatal injury.
Danger of severe or fatal injuries from electric shock or electric arcs.
– Have a high-voltage technician (HVT) or a high-voltage expert (HVE) re-energise the high-voltage system.
– → Rep. gr.93; Re-energise high-voltage system.
Tightening torques
♦ → Rep. gr.93; Assembly overview – charging socket