Volkswagen Taos: Bonnet, flaps, cab, central locking. Charging flap unit
- Assembly overview – charging flap unit
- Removing and installing charging flap unit
- Removing and installing LED module for charging socket 1 [L263]
- Removing and installing charging flap
Assembly overview – charging flap unit
Assembly overview – charging flap unit
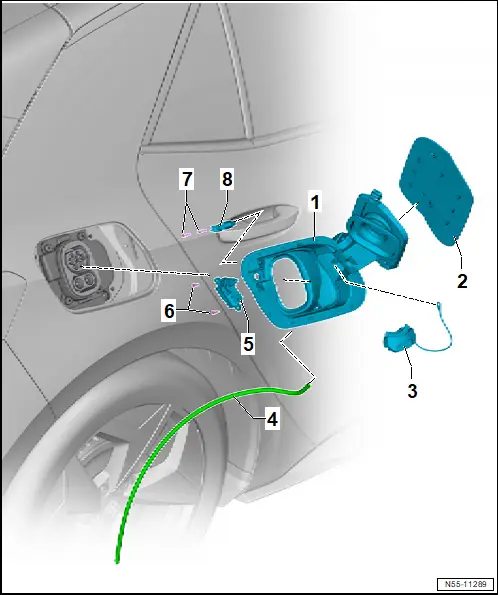
1 - Charging flap unit
❏ Renew after removing
❏ → Rep. gr.55; Removing and installing charging flap unit
2 - Charging flap
❏ → Rep. gr.55; Removing and installing charging flap
3 - Cap of high-voltage battery charging socket
4 - Water drain hose
5 - Actuator for high-voltage charging flap lock 1 -F496-
❏ → Rep. gr.55; Removing and installing LED module for charging socket 1 [L263]
6 - Bolt
❏ Qty. 2
❏ 1.5 Nm
7 - Bolt
❏ Qty. 2
❏ 1.5 Nm
8 - LED module for charging socket 1 -L263-
❏ → Rep. gr.55; Removing and installing LED module for charging socket 1 [L263]/[L264]
Removing and installing charging flap unit
Removing and installing charging flap unit
Special tools and workshop equipment required
♦ Removal wedge set -VAS 895 015-
Removing
Important
● The charging flap unit cannot be removed free of damage.
♦ When renewing components, identification labels from old parts indicating the corresponding spare part numbers in the → Electronic parts catalogue (ETKA) must be attached to the respective new parts as required by registration regulations.
♦ Renew any illegible or damaged identification labels and information or warning signs found on components of this vehicle, and affix the new ones in the same location. For allocation, see → Electronic parts catalogue (ETKA).
Note
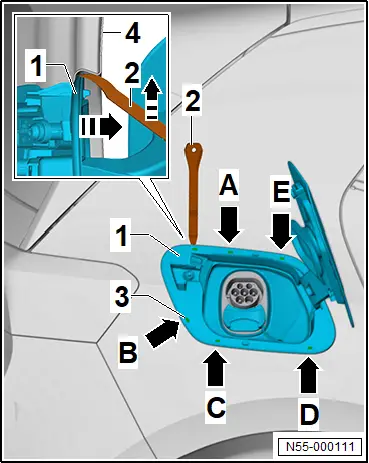
Locking devices of charging flap unit -1- are located at height of swage lines -3- and -arrow A- to -arrow E-. The number and position of the locking devices depends on the model.
– Spray soapy solution onto edge of charging flap unit -1-.
– Guide wedge number 26 -2- from wedge set -VAS 895 015- between edge of charging flap unit -1- and side panel -4- and release locking devices. Guide wedge No. 8 from wedge set -VAS 895 015- into gap between edge of charging flap unit -1- and side panel -4-, and leave it inserted.
– Release locking devices in the sequence -arrow A- to -arrow E- using wedge number 26 from wedge set -VAS 895 015-.
 NOTICE
Risk of damage caused in the process of swinging out the charging flap unit.
Risk of paint damage.
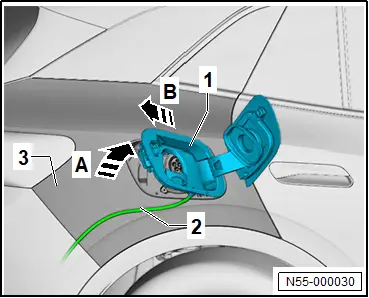
– Fold in charging flap.
– Swing charging flap unit -1- in direction of -arrow A- out of side panel -3-. While doing so, fold in charging flap enough so that it does not come into contact with side panel -3-.
– Disconnect electrical connectors.
– Pull out charging flap unit -1- together with water drain hose -2- in direction of -arrow B-.
– Detach water drain hose -2- from charging flap unit -1-.
Installing
Install in reverse order of removal, observing the following:
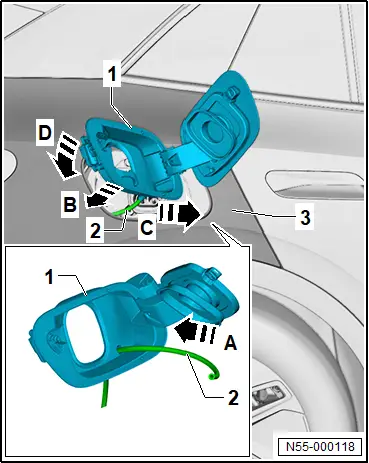
– Insert water drain hose -2- in direction of -arrow A- through opening in charging flap unit -1- and then pull it through to stop.
– Insert water drain hose -2- in direction of -arrow B- into side panel -3-.
 NOTICE
Risk of damage caused in the process of swinging in the charging flap unit.
Risk of paint damage.
– Fold in charging flap.
– Swing charging flap unit -1- in direction of -arrow C- into side panel -3-. Fold in charging flap enough so that it does not come into contact with side panel -3-.
– Connect electrical connectors.
– Push charging flap unit -1- in direction of -arrow D- against side panel until locking devices engage.
– Perform functional check with charging flap open.
Removing and installing LED module for charging socket 1 [L263]
Removing and installing LED module for charging socket 1 [L263]
Removing
– Remove charging flap unit → Rep. gr.55; Removing and installing charging flap unit.
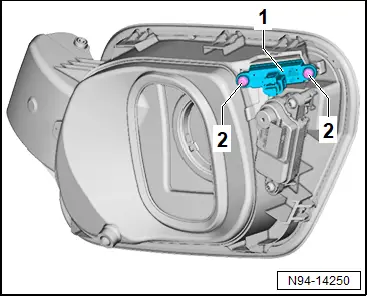
– Unscrew bolts -2-.
– Remove LED module for charging socket 1 -L263--1-.
Installing
Install in reverse order of removal, observing the following:
Tightening torques
♦ → Rep. gr.55; Assembly overview – charging flap unit
Removing and installing charging flap
Removing and installing charging flap
Special tools and workshop equipment required
♦ Scraper set -VAS 6845-
♦ When renewing components, identification labels from old parts indicating the corresponding spare part numbers in the → Electronic parts catalogue (ETKA) must be attached to the respective new parts as required by registration regulations.
♦ Renew any illegible or damaged identification labels and information or warning signs found on components of this vehicle, and affix the new ones in the same location. For allocation, see → Electronic parts catalogue (ETKA).
Removing
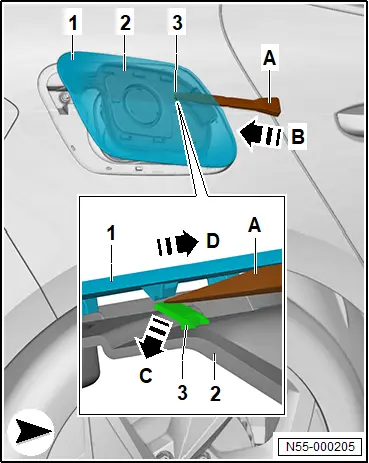
– Open charging flap unit -2-.
– Push wedge no. 1 -A- from scraper set -VAS 6845- in direction of -arrow B- between charging flap -1- and charging flap unit -2-.
– Unclip charging flap -1- in direction of -arrow C- from fastener -3-.
– Push charging flap -1- in direction of -arrow D-, and detach it.
Installing
Install in reverse order of removal, observing the following:
– Push on charging flap, making sure that fasteners engage audibly.